allprojects {
    repositories {
        jcenter()
        maven {
            url "https://releases.payworks.io/artifactory/mpos"
        }
    }
}
buildscript {
    ...
    dependencies {
        ...
        classpath "org.jetbrains.kotlin:kotlin-gradle-plugin:1.4.31"
    }
}
android {

    ...

    packagingOptions {
         exclude 'META-INF/*'
         exclude 'LICENSE.txt'
         exclude 'asm-license.txt'
    }
}
android {

    ...

    compileOptions {
        sourceCompatibility JavaVersion.VERSION_1_8
        targetCompatibility JavaVersion.VERSION_1_8
    }
}
plugins {
    ...
    id 'kotlin-android'
}
android {

    ...

    buildTypes {
        ...
        debug {
            matchingFallbacks = ['release']
        }
    }
}
dependencies {
    ...
    implementation 'io.payworks:paybutton-android:2.60.0'
}
    <application
        [...]
        android:largeHeap="true">
            [...]
    </application>
<uses-permission android:name="android.permission.INTERNET"/>
<uses-permission android:name="android.permission.BLUETOOTH"/>
<uses-permission android:name="android.permission.WRITE_EXTERNAL_STORAGE"/>
<uses-permission android:name="android.permission.ACCESS_NETWORK_STATE"/><uses-permission android:name="android.permission.READ_PHONE_STATE"/>
<uses-permission android:name="android.permission.CAMERA"/>
<uses-permission android:name="com.pax.permission.ICC"/>
<uses-permission android:name="com.pax.permission.PICC"/>
<uses-permission android:name="com.pax.permission.MAGCARD"/>
<uses-permission android:name="com.pax.permission.PED"/>
# Jackson
-keep class com.fasterxml.** { *; }
-dontwarn com.fasterxml.**

# Bolts
-keep class bolts.** { *; }
-dontwarn bolts.**

# Couchbase
-keep class com.couchbase.** { *; }
-dontwarn com.couchbase.**

# OkHttp
-keepattributes Signature
-keepattributes *Annotation*
-dontwarn com.squareup.okhttp.**
-keep class com.squareup.okhttp.* { *; }
-dontwarn okio.**

# Otto
-keepclassmembers class ** {
    @com.squareup.otto.Subscribe public *;
    @com.squareup.otto.Produce public *;
}

# Payworks
-keep class io.mpos.** { *; }
-dontwarn io.mpos.**

#PAX
-dontwarn com.pax.**
-keep class com.pax.** { *; }
val mposUi = MposUi.create(
            context = context,
            providerMode = ProviderMode.MOCK,
            merchantId = "yourMerchantIdentifier",
            merchantSecret = "yourMerchantSecret"
        )
MposUi mposUi = MposUi.create(
        this,
        ProviderMode.MOCK,
        "yourMerchantIdentifier",
        "yourMerchantSecret");
val transactionParameters = TransactionParameters.Builder()
            .charge(1.toBigDecimal(), Currency.EUR)
            .build()
TransactionParameters transactionParameters = new TransactionParameters.Builder()
        .charge(new BigDecimal("1.00"), io.mpos.transactions.Currency.EUR)
        .build();
Parameter | Description |
|---|---|
Subject | Subject for transaction. |
Custom Identifier | Optional custom identifier for transaction. |
Auto Capture | Defines whether the transaction should be automatically captured or pre-authorized. Default setting is true |
Meta Data | Set of key-value pairs that can be attached to transaction. |
Workflow | Defines whether transaction should use a point-of sale (POS) credit card workflow or a mail order / telephone order (MOTO) workflow. If more than one payment method is supported, setting the parameter to UNKNOWN triggers the Payment Method Selection screen. The default setting is POS . |
val transactionParameters = TransactionParameters.Builder()
        .charge(BigDecimal("1.00"), Currency.EUR)
        .subject("Bouquet of Flowers")
        .customIdentifier("yourReferenceForTheTransaction")
        .workflow(TransactionWorkflowType.UNKNOWN)
        .subject("Bouquet of Flowers")
        .metadata(
                mapOf(Pair("clerk", "John Doe"), Pair("sale commission", "2%"))
        )
        .build()
TransactionParameters transactionParameters = new TransactionParameters.Builder()
        .charge(new BigDecimal("1.00"), io.mpos.transactions.Currency.EUR)
        .subject("Bouquet of Flowers")
        .customIdentifier("yourReferenceForTheTransaction")
        .workflow(TransactionWorkflowType.UNKNOWN)
        .subject("Bouquet of Flowers")
        .metadata(
                new HashMap<String, String>() {{
                    put("clerk", "John Doe");
                    put("sale commission", "2%");
                }}
        )
        .build();
val transactionIntent = mposUi.createTransactionIntent(trasactionParameters)
Intent transactionIntent = mposUi.createTransactionIntent(transactionParameters);
startActivityForResult(transactionIntent, MposUi.REQUEST_CODE_PAYMENT)
startActivityForResult(transactionIntent, MposUi.REQUEST_CODE_PAYMENT);
override fun onActivityResult(requestCode: Int, resultCode: Int, data: Intent?) {
    super.onActivityResult(requestCode, resultCode, data)

    if (requestCode == MposUi.REQUEST_CODE_PAYMENT) {
        when (resultCode) {
            // Result code from a successful transaction
            MposUi.RESULT_CODE_APPROVED -> {
                val transactionIdentifier = data?.getStringExtra(MposUi.RESULT_EXTRA_TRANSACTION_IDENTIFIER)
                Toast.makeText(findViewById(android.R.id.content),"Transaction approved!\nIdentifier: $transactionIdentifier", Toast.LENGTH_LONG).show()
            }
            // Result code from a declined, aborted or failed transaction
            MposUi.RESULT_CODE_FAILED -> {
                Toast.makeText(findViewById(android.R.id.content), "Transaction was declined, aborted, or failed", Toast.LENGTH_LONG).show()
            }
        }
    }
}
@Override
protected void onActivityResult(int requestCode, int resultCode, Intent data) {
    super.onActivityResult(requestCode, resultCode, data);

    if (requestCode == MposUi.REQUEST_CODE_PAYMENT) {
        if (resultCode == MposUi.RESULT_CODE_APPROVED) {
            // Transaction was approved
            String transactionIdentifier = data.getStringExtra(MposUi.RESULT_EXTRA_TRANSACTION_IDENTIFIER);
            Toast.makeText(this, "Transaction approved, identifier: " + transactionIdentifier, Toast.LENGTH_LONG).show();
        } else {
            // Card was declined, or transaction was aborted, or failed
            // (e.g. no internet or accessory not found)
            Toast.makeText(this, "Transaction was declined, aborted, or failed",
                    Toast.LENGTH_LONG).show();
        }
    }
}
val latestTransaction = mposUi.latestTransation
Transaction latestTransation = mposUi.getLatestTransation();
val uiConfiguration = UiConfiguration(signatureCapture = SignatureCapture.ON_RECEIPT)
mposUi.setConfiguration(uiConfiguration)
UiConfiguration configuration = new UiConfiguration.Builder()
        .signatureCapture(UiConfiguration.SignatureCapture.ON_RECEIPT)
        .build();

mposUi.setConfiguration(configuration);
val uiConfiguration = UiConfiguration(accessibilityModeOption = AccessibilityModeOption.OPTION_VISIBLE)
mposUi.setConfiguration(uiConfiguration)
UiConfiguration configuration = new UiConfiguration.Builder()
        .accessibilityModeOption(UiConfiguration.AccessibilityModeOption.OPTION_VISIBLE)
        .build();

mposUi.setConfiguration(configuration);
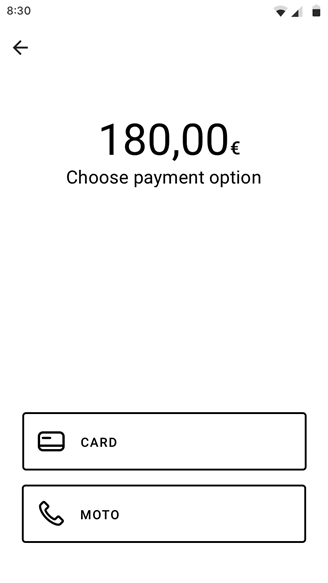
val uiConfiguration = UiConfiguration(paymentOptions = setOf(PaymentOption.CARD, PaymentOption.MOTO))
mposUi.setConfiguration(uiConfiguration)
UiConfiguration configuration = new UiConfiguration.Builder()
        .paymentOptions(
                EnumSet.of(
                    UiConfiguration.PaymentOption.CARD,
                    UiConfiguration.PaymentOption.MOTO
                )
        )
        .build();
mposUi.setConfiguration(configuration);