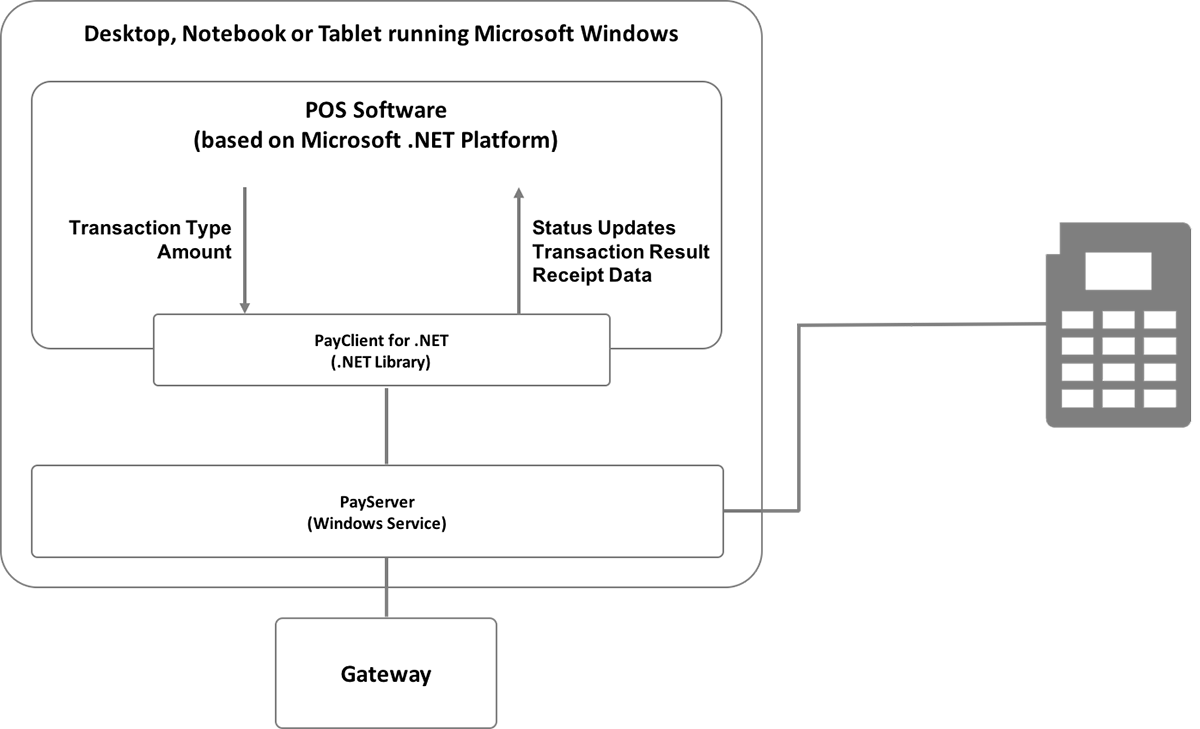
The PayClient is an easy-to-use library to process transactions with the PayServer. It provides a high-level implementation of the PayProtocol (P3)for quick integration. You can:
Install PayClient
Select login and device
Start a transaction
Abort a transaction
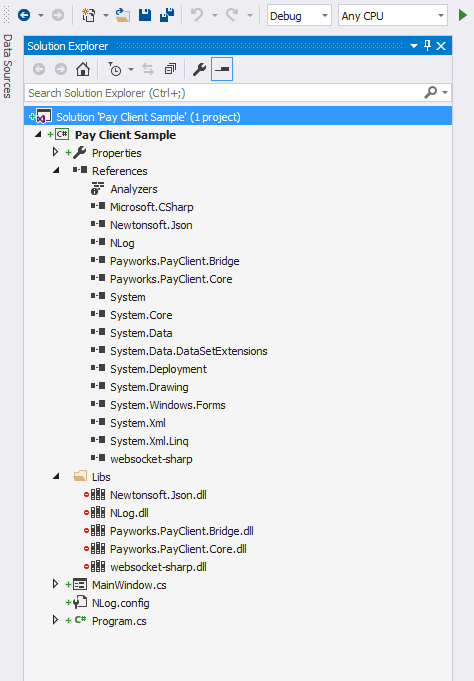
The PayClient for .NET bundle contains prepackaged assemblies that must be added to your project. There are also external dependencies that you need to add manually (or use Nuget to add them automatically). After you add the required elements to your project, you will have access to PayClient classes and can start integrating with PayServer.
The PayClient targets .NET Framework 4 (and above) and should work on any Windows version that supports this version of the .NET Framework.
The PayClient Sample App contains a small pre-build application that allows you to quickly test connectivity to PayServer. To perform the test, provide the PayServer remote address and your merchant credentials.
The PayClient Assemblies include:
Payworks.PayClient.Bridge.dll (Protocol and Models)
Payworks.PayClient.Core.dll (Client and Communication)
The External Dependencies include:
NLog (https://www.nuget.org/packages/NLog/, see NLog.dll)
Json.NET (https://www.nuget.org/packages/Newtonsoft.Json/, see Newtonsoft.Json.dll)
WebSocketSharp (http://www.nuget.org/packages/WebSocketSharp, see websocket-sharp.dll)
When you add the dependencies manually, the resulting reference tree should look similar to the example shown below.
Selecting Login and Device
After adding the PayClient dependencies to your project , you are all set to integrate payments. The following instructions will guide you through the steps required to implement on your side. To use PayClient, configure PayServer to use
P3_WEBSOCKET
as the server protocol.
Initializing a New PosClient
Initialize a
PosClient
instance with your credentials and the address of your PayServer instance you have running. With this instance you have access to all functionality of the PayServer.
PosClient = new PosClient(PAY_SERVER_ADDRESS, PAY_SERVER_PORT);
Connecting to PayServer
Connect to the PayServer to establish a connection and initialize the PayServer with your credentials. After a successful connect you will receive a list of devices that are configured and available for you to use.
PosClient.ConnectAndLogin(MERCHANT_IDENTIFIER, MERCHANT_SECRET, Environment.TEST,
    (devices, error) =>
    {
        //check for error
        //use devices for interaction
        Device = devices[0];
    });
Disconnecting from PayServer
To close the session, disconnect from the server.
PosClient.Disconnect(
    (error) =>
    {
        //check for error
        //this should normally always succeed
    });
Reconnecting to PayServer
To reconnect after a disconnect, initialize a new
PosClient
instance.
After a successful log in, you will receive a list of devices that are configured on the PayServer. You can then use the
Device
object to start a transaction. Each
Device
also contains meta information that has been configured on the server side. You can either choose the first device on the list or inspect the properties to select the device you would like to use.
You can start a new transaction through the
ITransactionModule
from the
PosClient
.
When starting a new transaction, you provide the
Device
and the
TransactionParameters
that specify the amount, currency, and other parameters for the transaction. The
Builder()
will help you create a suitable set of parameters.
var transactionParameters = new TransactionParameters.Builder()
    .Charge(10.00m, Currency.EUR)
    .Subject("Box of chocolates")
    .CustomIdentifier("yourReferenceForTheTransaction")
    .Build();
With the created
TransactionParameters
you can then start the actual transaction. When starting a transaction, you must provide three callbacks that are used while processing the transaction:
The
TransactionStatusUpdated
callback provides you with status information throughout the transaction that you need to show to the merchant.
The
TransactionActionRequired
callback informs you that an action, like customer signature, is required for the transaction to continue.
The
TransactionCompleted
callback lets you know that the transaction is finished.
In addition, an
IInteractiveProcess
is returned, which you can use to abort the transaction and submit a signature if the transaction requires it.
var transactionProcessParameters = new TransactionProcessParameters.Builder().Build();

InteractiveProcess = PosClient.GetTransactionModule().StartTransaction(Device, transactionParameters, transactionProcessParameters,
    (transaction, transactionProcessDetails, abortable) =>
    {
        // transaction update information

        // abortable indicates if the transaction can be aborted in the current state

        // transactionProcessDetails.Information array indicates human-readable the state information:
        // always show those two status lines in your merchant-facing UI

        // transactionProcessDetails.Information[0]
        // transactionProcessDetails.Information[1]
    },
    (actionType) =>
    {
        // check for action type
        if (actionType == Transactions.Actions.ActionType.SIGNATURE)
        {
            // submit digital signature.
            // signature field takes a byte array (byte[])
            InteractiveProcess.SubmitSignature(signature, (error) =>
            {
                // check for error
            });

            // or collect signature on the receipt after transaction
            InteractiveProcess.SubmitSignatureOnReceipt((error) =>
            {
                // check for error
            });
        }
    },
    (transaction, transactionProcessDetails, error) =>
    {
        // check for error
        if (error != null)
        {
            // error indicates that there was a error with the transaction processing
            // check error.Type and error.Message for more information
         }
         else
          {
              // Inspect the transaction.Status to get the overall result / transaction completed
              if (transaction.Status == TransactionStatus.APPROVED) // DECLINED / ABORTED
              {
                   Console.WriteLine("APPROVED: " + transaction.Identifier);

                   // Save the Transaction.Identifier for later REFUNDs
                   // transaction.Identifier

                   // Provide a printed receipt to the merchant and shopper
                   // transaction.MerchantReceipt
                   // transaction.CustomerReceipt
              }
          }
    });
Using Status Update Callback
The
transactionProcessDetails.Information[]
array of the
TransactionStatusUpdated
callback will always contain two strings that describe the current state of the transaction.
Make sure to always show those two status lines in your merchant-facing UI.
If you want to further customize your UI based on the state of a transaction, make use of the
details
enum that provides fixed workflow steps.
Providing Signature in Action Required Callback
The
TransasctionActionRequired
callback informs you that an action is required for the transaction to continue. The
actionType
indicates what type of action the transaction is expecting.
If the
actionType
is
ActionType.SIGNATURE
, then you can provide the signature using the
IInteractiveProcess
that the
StartTransaction
returned as shown in the code snippet above. You can call
SubmitSignature
method that accepts a byte array as the digital signature or you can call the
SubmitSignatureOnReceipt
method if you want to accept a signature on the receipt after the transaction is complete.
You can also configure the behavior of Signature action in the PayServer.
Transactions can be aborted directly from the terminal. The feature is usually displayed on the card reader as a red "X". However, it is recommended that you enable the merchant to be able to abort transactions directly from the point-of-sale (POS) system. Not all transactions can be aborted and there are some restrictions on when a transaction can be aborted. The card schemes mandate when an transaction abort can be issued.
Make use of the
Abort()
method on the
IInteractiveProcess
that was returned when you started the transaction.
After calling the abort method, wait for the direct callback and also for the
TransactionCompleted
callback of the transaction itself.
Aborting a transaction might take a few minutes, depending on its state. Do not assume that the transaction is over after call the method. There will always be a proper
TransactionCompleted
callback.
InteractiveProcess.Abort(
    (status, error) =>
    {
        //check for error and status
    });